This Website uses third-party cookies, which are owned by a person or organization other than KATIA from which KATIA has contracted a service to monitor and improve the services offered on its Website. This third party processes the data gathered by its cookies.


How to make a macramé headboard - Easy DIY
July 07, 2021
Learn how to make a beautiful macramé headboard with just three colors of our Macramé Cord!
08/29/2022

In this free tutorial, you will learn step by step how to make a beautiful macramé headboard with just three colors of our sturdy Macramé Cord. This headboard is a beautiful project with which to learn the art of macramé and to decorate your favorite corner. Easily bring comfort to your home with just a few basic macramé knots.
The materials you will need to complete this project are:
- Macramé Cord:
- 3 balls of Color 100
- 1 ball of Color 113
- 1 ball of Color 118
- Pole measuring 170 cm
- Scissors
- Tapestry needle
Recommendations and useful information for your macramé headboard
Cut lengths of Macramé Cord as follows:
- Color 100
- 98 lengths of 275 cm
- 4 lengths of 250 cm
- 28 lengths of 60 cm
- Color 113
- 24 lengths of 100 cm
- 20 lengths of 65 cm
- Color 118
- 25 lengths of 100 cm
- 20 lengths of 65 cm
Before you start, take a look at our free online videos showing basic Macramé knots and the more advanced online Marcamé course.
Knots used in this tutorial
- Diagonal Double Half Hitch Knot
- Lark's Head Knot
- Spiral Knot
- Square Knot
How to make your macramé headboard step by step
1. Attach the 98 longest lengths of Color 100 to the pole using the Lark’s Head Knot, then separate the cords into 7 groups of 28.
2. Begin to create rows of Square Knots with the cords as follows:
-
- Row 1, First Square Knot: Tie a Square Knot around the second and third cords with the first and fourth cords.
- Row 1, Second Square Knot: Repeat with the second group of four cords.
- Row 1, Subsequent Square Knots: Repeat across the group of 28 cords.
- Leave the first two and the last two cords of the previous row unworked.
- Row 2, First Square Knot: Make a Square Knot with the central cords under the First and Second Square Knots of Row 1.
- Row 2, Second Square Knot: Make a Square Knot with the central cords under the Second and Third Square Knots of Row 1.
- Row 2, Subsequent Knots: Repeat across the seven Square Knots of Row 1.
Keep working in this pattern to create Rows 3 to 7.
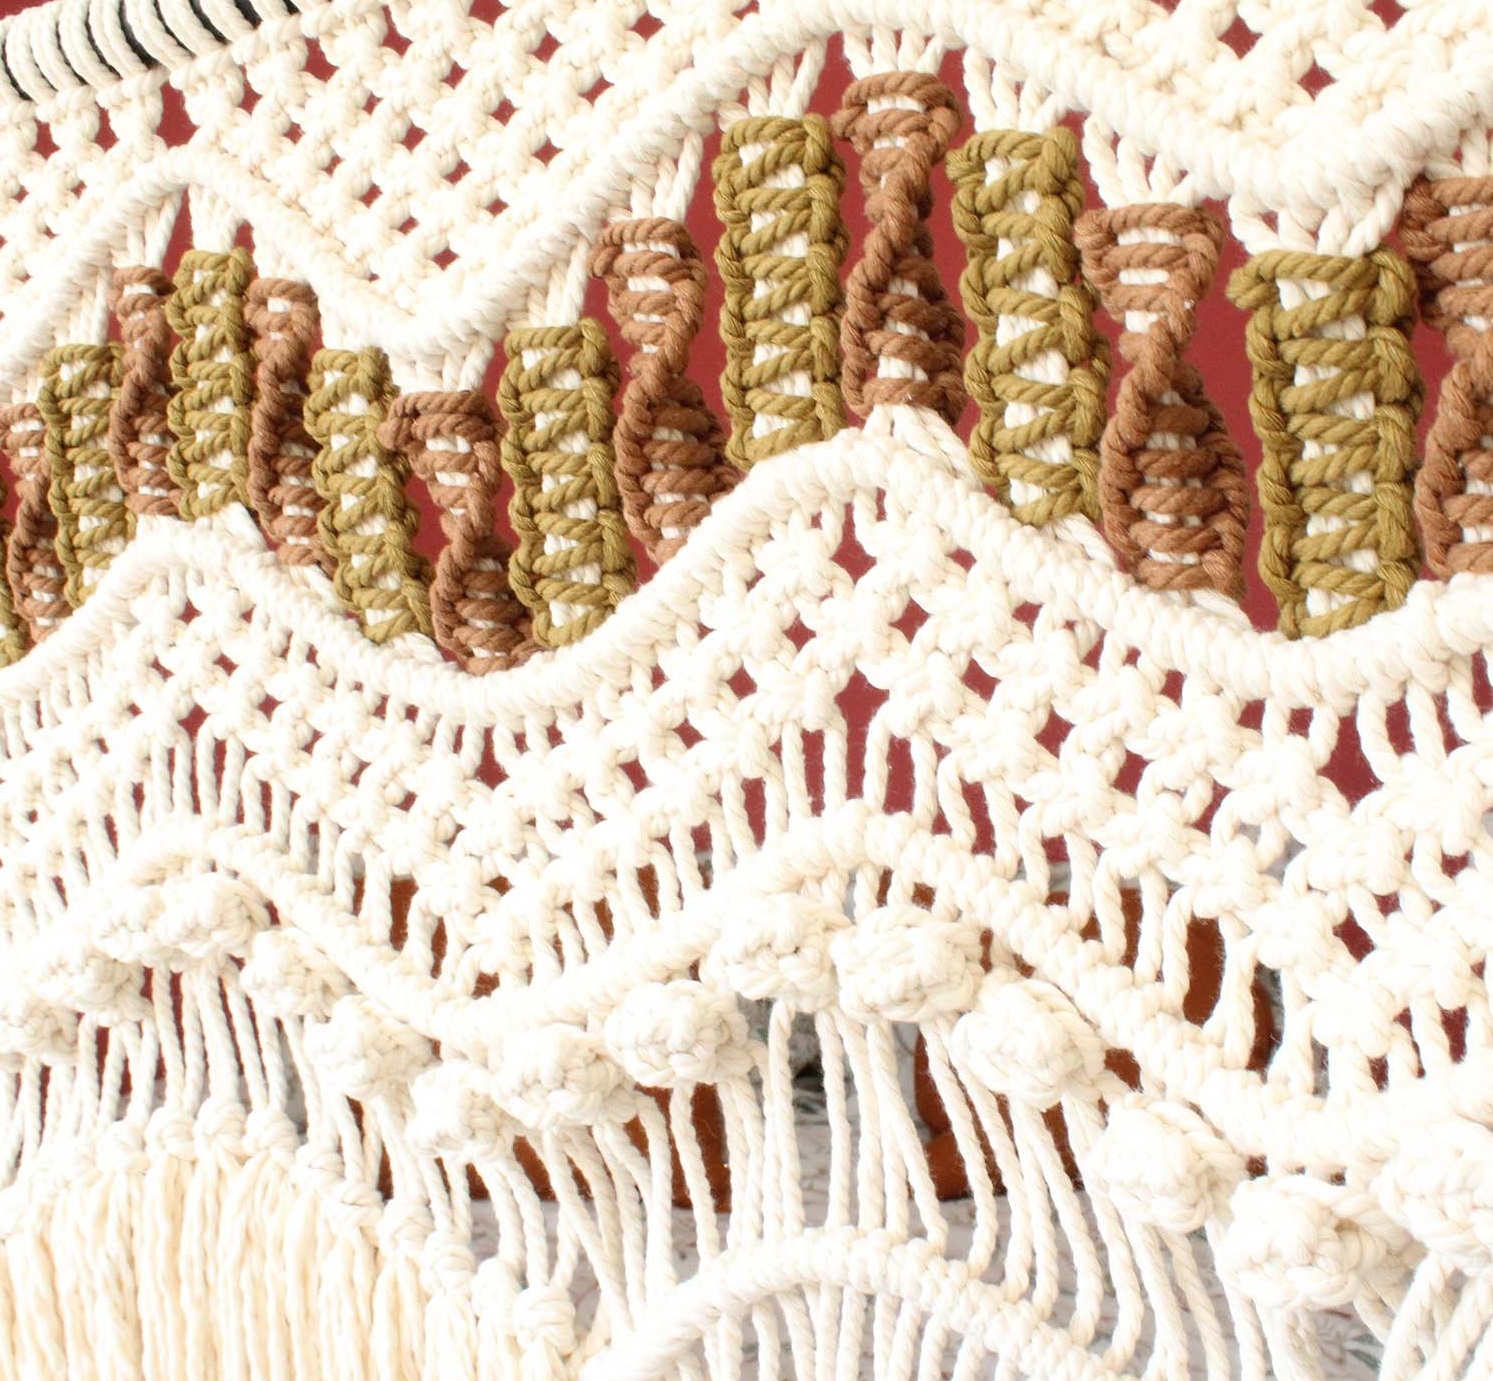
3. With one of the 250 cm cords of Color 100, tie a series of Diagonal Double Half Hitch Knots close to the Square Knots from Step 2.
4. With the 100 cm cords (Colors 113 and 118), make 10 Spiral Knots around four of the base cords. Alternate between the two colors. Make the first Spiral Knot as close as possible to the knots from Step 3. Make sure to turn the base cords after the fifth Spiral Knot.
At the end of each group of ten Spiral Knots, hide the ends by tying a knot in the back of the work and weaving them in with a tapestry needle.
5. With the second of the 250 cm cords of Color 100, tie a series of Diagonal Double Half Hitch Knots next to the Spiral Knots from Step 4 to create the wavy motif across the entire length of the work.
Separate the cords into 7 groups of 28 cords again.
6. Make a Square Knot using the first four cords, then make a Square Knot with the last two cords of that knot and the next two cords. Continue working like this until there are six Square Knots on the left side of the group of 28 cords.
7. Now, starting with the last four cords of the same group of 28 and working toward the left, make six Square Knots in the same manner, but on the right side.
8. Make a Square Knot with the four central cords at the bottom of the group.
9. Repeat Steps 6 to 9 across your work, making an additional Square Knot at the top of the ondulations, between the groups of 28.
10. Make a second row of Square Knots in the same manner, with six Square Knots to the left, six Square Knots to the right, and one Square Knot at the bottom, in the middle.
11. With the third of the 250 cm cords of Color 100, tie a series of Diagonal Double Half Hitch Knots 2 cm below the motif created in the previous step.
12. Make a row of Square Knot Buttons as follows:
Tie three Square Knots with the first group of four cords. Take the two central cords and pull them through the top, between these same cords. To close the button, make one last Square Knot at the bottom, with the lateral cords.
13. With the last of the 250 cm cords of Color 100, tie one last series of Diagonal Double Half Hitch Knots across your work, 8 cm below the Square Knot Buttons created in the previous step.
Adding the fringe
-
- Cut all of the cords 57 cm from the pole.
- Using the 65 cm lengths of colors 113 and 118, create the fringe on the left and on the right of your work by wrapping one length of each color together behind two cords, just above the motif from Step 13 at the bottom of the work, then between those same cords and through the loop created.
- Add volume to the fringe by unraveling the cords.
- In total, add twenty pieces of fringe consisting of two cords each on both sides of the work.
- Cut the fringe following the wave motif.
Add pieces of fringe of Color 100 around the central part of the work. Unravel the cords to add volume, then cut them into a semi circle shape. To finish, weave the ends in behind the work using the tapestry needle.
Congratulations! Your beautiful headboard is ready to be hung on your wall!

If you enjoyed making this macramé headboard, you should definitely check out our other macramé patterns
Validate your login
Sign In
Create New Account