This Website uses third-party cookies, which are owned by a person or organization other than KATIA from which KATIA has contracted a service to monitor and improve the services offered on its Website. This third party processes the data gathered by its cookies.


How to sew a women’s colourblock shirt: FREE pattern
April 18, 2023

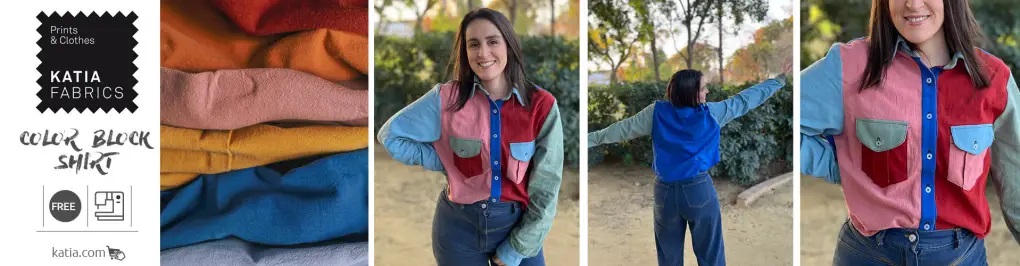
Learn to make a colourful shirt with our sewing pattern and tutorial
04/18/2023

Spring fashion means bold, fun, and creative. And this is exactly what this trendy colourblock women’s shirt will mean for your wardrobe. Pick out the right Katia fabric shades for your style and learn how to sew your very own unique, personalised piece.
Use this video tutorial, step-by-step guide, and free, exclusive pattern from Ana – the avid sewer and clothes creator behind @nanitatelier. She shows you how to make this shirt from start to finish, including how to sew a placket and a collar with your sewing machine.
The materials you will need to complete this project are
- Our free pattern
- Fabric requirements per size: size S – 74 3/4″ (190 cm) / size M – 76 3/4″ (195 cm) / size L – 76 3/4″ (195 cm) / size XL – 78 3/4″ (200 cm)
- Size 12 mm buttons: 6-8 units
- Lightweight thermo-adhesive interfacing
- Scissors
- Pins
- Paper scissors
- Measuring tape
- Tailor’s chalk
- Yarn snippers
- Iron
- Sewing machine
Useful information for your backpack sewing project
- Read all the instructions for the pattern carefully.
- Cut out the pattern pieces in paper before you cut the fabric.
- Use this guide to show you how to trace and cut out pattern pieces.
- Assemble the fabric pattern pieces before sewing to check everything is right.
- We strongly recommend using Katia’s Rustic Cotton fabric (this is what Ana chose for her creation).
Sew your colourblock women’s shirt
- Match the right side of the button placket to the wrong side of the front.
- Sew the pieces together 1 cm from the edge.
- Iron the button placket towards the right side of the front.
- Iron the (1 cm) seam allowance inwards at the lower edge of the button placket.
- Sew to the edge so that the button placket is attached.
- Do the same with the other front. In order to know which placket belongs to which side, place them with the right sides of the fronts and the button plackets facing upwards, and make it line up with the curve at the upper end.
- Sew the back and the fronts together at the shoulders, with the right sides of the fabrics facing each other.
- Finish off the seams with an overlock or zigzag stitch.
Pockets
- Make the pockets and sew them onto the fronts: match the notches on the outer fabric to the ones on the inner fabric.
- Iron 1 cm inwards around the pocket edges and make the upper hem by folding the upper edge inwards at the point marked by the notches.
- Fold the upper edges inwards again to make a double hem. Sew the upper hem in place.
- Position the pockets on the lower horizontal lines on the fronts and sew in place very close to the edges.
- Sew the pocket flaps: Place one interlining and one exterior piece together, with the right sides facing each other, and sew 1 cm from the edge leaving the upper edge unsewn.
- Make small cuts in the seam allowance at the corners and turn out to the right side.
- Place the right side of the flaps on the right sides of the fronts at the upper horizontal lines, leaving the line 1 cm from the placket edge.
- Sew and press downwards to fix in place.
- Work a row of stitching 1 cm from the edge of the placket to fix in place and hide the seam.
Sleeves
- Sew the sleeve opening, fold the sides facing inwards on the side with the pleats, and sew to the edge of the bias, covering the previous seam.
- Match the bias from the back and join the end in diagonal.
- Close the sleeves, joining the sleeve notches to make the pleats.
- Match the right sides of the sleeves to the body, matching the notches together.
- Sew along the edges at a distance of 1 cm and then finish the seam edges with an overlock or zig-zag stitch.
Cuffs
- To sew the cuff: place one outer fabric piece together with an interfacing piece.
- Iron 1 cm towards the inside of the pieces.
- Sew at 1 cm from the edge from the 1 cm that has been pressed inwards. Leave the straight part unsewn.
- Make small cuts in the curved seams and turn out to the right side.
- Match the cuff to the back of the sleeve and sew at 1 cm from the edge.
- Leave the seam allowance inside the cuff and sew the opening near to the edge to close, leaving the seam allowance concealed inside.
Collar
- Sew the collar: sew the collar pieces together with the right sides facing each other.
- Sew around the contour, 1 cm from the edge. Make small cuts in the curved seam allowances.
- Turn the collar out to the right side, press and sew a row of stitching close to the edges of the collar.
- Place the right sides of the collar stand to the right sides of the collar, matching the notches together.
- Iron 1 cm inwards on one of the collar pieces.
- Sew 1 cm from the edge from the 1 cm that was pressed inwards.
- Make small cuts in the curved seam allowances. Turn out to the right side. Press to fix in place.
- Match the collar to the back neckline and sew 1 cm from the edge.
- Leave the seam allowance inside the collar and sew close to the collar edge, leaving the seam allowance concealed inside.
To finish, sew the shirt hem, make the buttonholes and sew on the buttons!
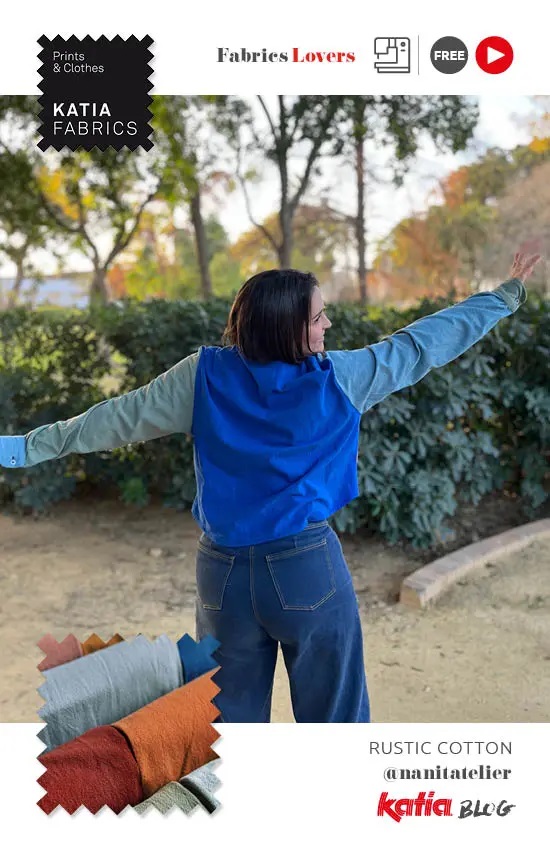
Now it’s time to choose your favourite selection of colours from our Rustic cotton fabric collection. We recommend choosing contrasting shades to get the bold colourblock effect.
And if you want more spring/summer inspiration, check out our wide range of light, breathable, fun fabrics for the warmer seasons: Katia spring/summer fabrics.
Validate your login
Sign In
Create New Account