This Website uses third-party cookies, which are owned by a person or organization other than KATIA from which KATIA has contracted a service to monitor and improve the services offered on its Website. This third party processes the data gathered by its cookies.


How to make a crochet stole for all seasons - FREE TUTORIAL
December 22, 2023
Discover timeless elegance: dive deep into the world of tasseled crochet wraps for every season
12/22/2023

Meet the heart and soul behind Crochet Road, Joy Clements. It’s been about a decade since she fell in love with the art of crocheting, and it has since turned into a full-time passion. As part of her creative process, she enjoys weaving vibrant colors and experimenting with diverse textures, and exploring new stitches and techniques. She‘s a native of the Gold Coast in Australia, and she draws inspiration from her two vivacious daughters who have a sharp eye for color. Joy's designs have graced the pages of magazines, books, and yarn brand collections. Her illustrious work can be found on platforms like Instagram, Ravelry, Facebook, and her Youtube channel.
Today, Crochet Road brings to you the mesmerizing pattern of the Emma Wrap. Dive into this free video tutorial and let your fingers dance to create a captivating crochet stole adorned with tassels using the exquisite Katia Cotton-Cashmere. It's not just a craft; it's a journey of inspiration and creation. Let the magic of crochet begin!

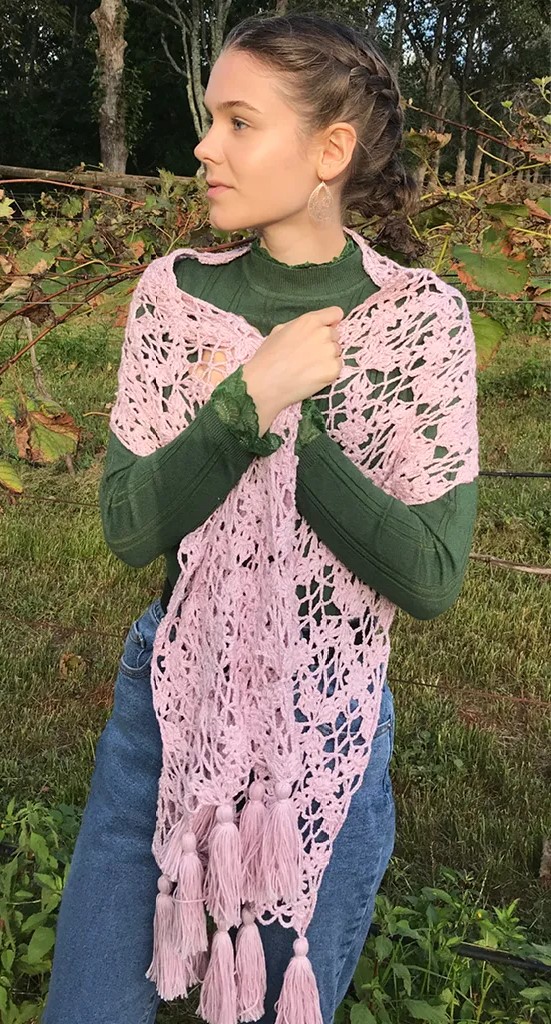
Crochet Stole with Tassels:
Discover the timeless elegance of this crochet stole, crafted with interlinked granny squares. The tassels bring a touch of romantic and feminine air into its design. The Emma Wrap promises a gentle embrace of cotton and cashmere as it is made with the plush Katia Cotton-Cashmere yarn. This versatile wrap is the perfect accessory, perfect for brisk autumn evenings, serene mid-season days, or sunny winter mornings.
If you do crochet your own Emma Wrap, please share the results on social media with the hashtags #emmawrap, #crochetroad and #katiayarns.

The Emma Wrap Video Tutorial:
Design by the talented Joy Clements @crochetroad
Before diving in, it's imperative to read the pattern thoroughly. Navigating join-as-you-go patterns can be intricate, especially for newcomers.
For best results, ensure you work chain stitches quite tightly.
Watch this video for a complete overview.
The beauty of this design lies in the interconnected motifs. Start by crafting one full motif. As you move forward, work on each motif up to round 4, seamlessly joining them during the latter part of this round. (Detailed joining instructions provided below.) Dressed in the soft embrace of the cotton-cashmere yarn, and adorned with charming tassels, this stole promises a romantic vintage allure. Dive in, let your creativity soar, and let the world of crochet mesmerize you!
We hope you enjoy creating your own Emma Wrap, as well as wearing it!
Materials
Katia Cotton-Cashmere col. 64: 6 balls
Crochet hook size: 3mm
Abbreviations
-
Ch – chain
-
Sc – single crochet
-
dc – double crochet
-
tr – treble crochet
-
sl-st – slip stitch
-
st(s) – stitch/es
-
rep – repeat
-
Rnd(s) – round(s)
-
picot – Ch4, sl-st worked into top of both loops of 4th Ch from hook (see image 1)
-
2dcCL – (yarn over, insert hook into designated st/space, draw up a loop, yarn over, draw through 2 loops) 2 times in same st/space, yarn over and draw through all 3 loops on hook
-
2trCL – (yarn over twice, insert hook into designated st/space, draw up a loop, yarn over, draw through 2 loops twice) 2 times in same st/space, yarn over and draw through all 3 loops on hook
-
PLT sl-st join – (pull loop through, sl-st join) – remove working loop from hook, place hook as directed down through corresponding Ch space on adjacent/opposite motif as indicated, pick up working loop and pull through Ch space, sl-st
GAUGE
First unblocked completed motif measures 9cm x 9cm

Instructions
Rnd1: Ch4, sl-st in beginning Ch to form ring.
Ch2, dc (counts as first 2dcCL throughout), Ch2, *2dcCL, picot, 2dcCL, Ch2* rep ** 2 more times, 2dcCL, picot, sl-st to top of first dc (see image 2).
<8 x 2dcCL, 4 picots, 4 Ch-2 spaces>
Rnd2: (sl-st, Ch2, dc, Ch3, 2dcCL) in next Ch-2sp, Ch7, *(2dcCL, Ch3, 2dcCL) in next Ch-2sp, Ch7*, rep ** around, sl-st to top of first dc (see image 3).
<8 x 2dcCL, 4 Ch-3 spaces, 4 Ch-7 spaces>
Rnd3: (sl-st, Ch2, dc, Ch2, 2trCL, Ch2, 2dcCL, Ch8) in next Ch-3sp, *(2dcCL, Ch2, 2trCL, Ch2, 2dcCL, Ch8) in next Ch-3sp*, rep ** around, sl-st to top of first dc (see image 4).
<8 x 2dcCL, 4 x 2trCL, 12 Ch-2 spaces, 4 Ch-8 sps>
For first full motif, follow these instructions completely for Rnd4. For subsequent motifs, work the round up until a joining point then join as instructed below.

Rnd4: (sl-st, Ch2, dc, Ch 2) in next Ch-2 sp, *(2trCL, ch 4, 2trCL, ch 2) in top of 2trCL, 2dcCL in next Ch-2 sp, Ch7, spike sc enclosing Ch from previous 2 rounds, Ch7,** 2dcCL in next ch-2 sp, Ch2; rep from * three more times, finishing last repeat at **, sl-st to top of first dc. Fasten off. (see image 5)
<8 x 2dcCL, 8 x 2trCL, 4sc, 8 Ch-2 sps, 4 Ch-4 spaces, 8 Ch-7 spaces>

Joining Instructions
All motifs are joined with right side facing up. These instructions take into consideration my Right hand dominance. Join the first row of motifs from Left to Right – that is, lay motif 2 (the completed motif) to the right of motif 1 (the one being completed) then make the join as outlined below. The order you complete the joins is from one Ch-4 spaces corner, down the side and to the next Ch-4 spaces corner. Join the first 15 motifs into one long row before beginning to join the next row.
How to join corners (images 6, 7, 8)
Begin working round 4, stopping just before the Ch-4 space in the corner of the motif, and replace this Ch4 with: (Ch2, PLT sl-st join, Ch1) (see image 6).
Then complete the corner of the working motif with (2trCL, Ch2) in top of 2trCL, 2dcCL in next Ch-2sp, then join down side & go onto join next corner.

How to join motifs down each side (images 9, 10, 11, 12)
Replace Ch7 with: Ch3, PLT sl-st join to first Ch-7 space on side of adjoining motif, Ch3, spike sc (enclosing Ch of previous 2 rnds) on original motif, Ch3, PLT sl-st join to second Ch-7 space on side of adjoining motif, Ch3), then go onto join the next corner.
For first side length of motifs, continue with remainder of motif – *2dcCL in next Ch-2sp, Ch2, (2trCL, Ch4, 2trCL, Ch2) in top of 2trCL, 2dcCL in next Ch-2sp, Ch7, spike sc enclosing Ch from previous 2 rnds, Ch7*, rep** around, sl-st to top of first dc. Fasten off.

When joining adjacent corners along all four LONG SIDE edges of wrap, join as follows: (Ch2, PLT sl-st join, Ch1) then complete side. (see images 13, 14)

For motif Rows 2, 3, 4 (with each row containing 15 motifs)
When joining corners of motifs that aren’t along sides of wrap, join diagonally opposite corners as you come to them (Ch 2 PLT sl-st join,Ch1). Refer to my videos for more details, and a clear visual example of how to join this project as you go. (see images 8, 9, 10, 11, 12)
How-to for tassel
Make & attach tassels along each short edge. You will need a book or piece of thick corrugated cardboard about 13cm wide. Make 40 full wraps around the width of the cardboard, then cut the yarn. Feel free to make tassels with less yarn, but if you use more wraps than 40, you may of course need extra yarn to make 10 tassels. Cut a piece of yarn twice the length of your forearm for tying off top of the tassel, slide under all wraps, and make a tight square knot. Slide off cardboard.

Attach to WRONG SIDE of wrap with tight square knot, (See Image 15, stitch markers show where to attach each tassel on wrap). Then bring both strands that were used to tie on the tassel down so they become part of the tassel itself. This ensures no ends need weaving in.
Cut a piece of yarn twice the length of your forearm for tying around the entire tassel a few times in the same place, about 2 cm from top of the tassel.
Carefully cut looped ends of tassel.

Use a wide toothed comb to comb the strands out, then trim to required length. Steam completed tassel to relax merino and cashmere fibers, and keep the strands of yarn laying straight, forming a neat finished tassel.
Validate your login
Sign In
Create New Account